Thursday, May 21, 2020

Midnight Graphique Scarf

Yesterday I received this beautiful issue of Interweave Crochet Summer 2020 in the mail with my Midnight Graphique Scarf included in the beautiful designs in this issue.  


A little background on this scarf/wrap design.... It originally started out as a scarf I made in Nazli Gelin Garden Metallic in the color Midnight/Silver.  It is a beautiful thread with a silver thread running thru it.  Easy to work with, too.  I had seen it advertised in the Herrschner's  catalog (here is the link to that thread) 
and wanted to try a project with it.  The thread balls aren't very large so it took almost all of 3 of them to make this long skinny scarf. 


Here is a closeup of the pattern on the original scarf. 


It is 71 1/2" long without the fringe and 91 1/2" long with x 6 3/4" wide. 


I love the super long fringe on it, too.  That's what took a LOT of the thread to make. 
So I submitted it to Interweave Crochet and they chose it for this issue.  They wanted it to be wider to be it more of a wrap and a scarf. The finished size turned out to be 18" x 60" without the fringe and it has 10" of fringe on each end.  Since the thread is about a size 10 it is very lightweight and not bulky at all.  The thread they chose for the project is Omega Rustica Eclat (distributed by Creative Yarn Source) and it is in the color C68 Royal/Silver.  Almost identical to the thread I had used originally.  Maybe a little bit lighter blue but has the silver thread running thru it.  It is also worked using a size 6/1.8mm hook.  It was one of those projects I took with me to work on different places and the one time I was working on it this man said "I don't know what you are making but it looks like it is going to take a while" !!  It wasn't that bad, I just had bits and pieces of time to work on it since it was in the fall when we are busy harvesting so it seemed  like it took longer than it did.  The editor also wanted the fringe more spread out on the wider scarf/wrap.  Looks great this way, too!!  It would have been to "heavy" looking to have had it in every space across the end of the wider piece. 


Here is a picture of it on the blocking board....


....and a full view of it on the blocking board.


And here are 4 awesome photos of it that Interweave Crochet took and shared with me.  They make all my projects look so professional!!!  
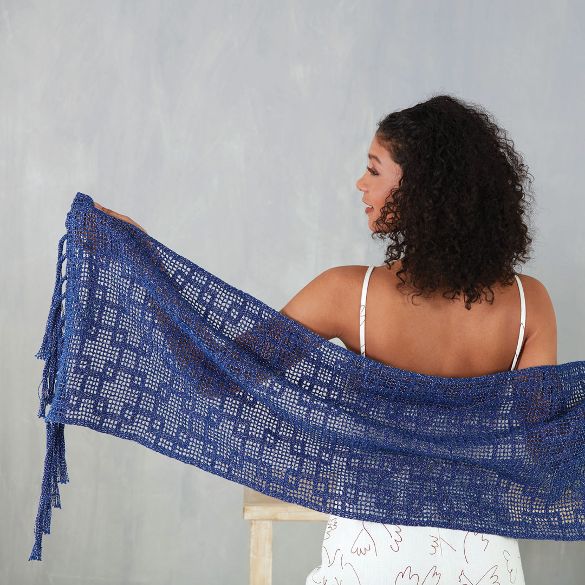


It would be a great little wrap around the shoulders on a summer evening after the sun goes down.  It is very easy to make in filet crochet with a very simple repeat pattern to follow.  

Thank you Interweave Crochet for including my design in this beautiful issue.  If you want to get your own copy it will be available at https://www.interweave.com/crochet/ after May 28th and should be in the stores around June 9th.  It will also be on Ravelry after May 28th as well for more details on this pattern.  I hope you will give it a try!!  


Sunday, April 12, 2020

Waterlily Doily


When I saw the sneak peek of the June 2020 Crochet World I had to do a triple take!!  I couldn't believe it when I saw my doily on the front cover!!!  


It is the Waterlily doily.  I had originally made it in Aunt Lydia's size 10 Wood Violet, Frosty Green and Cream but they chose Lizbeth Snow White, Sky Blue  Lt and Green Orchid Dk.  I loved how it looked so much in the colors they chose and I had leftover thread from the project so I made one for myself.  


I entered it in all the fairs last fall and at the state fair it took 3rd, Frederick Fair it took 2nd and Middletown Community show it got 1st!!  It seemed to get better at every show!!  It was funny, at the community show I heard the one judge say "it's pretty but it must have been made to match the colors in a room".  I had never thought about that before.  Occasionally I'll make things to match a room but mostly I just make them in the colors that seem to pop out to me that it would look good in....

I hope you will get a copy of Crochet World and try this doily for yourself.  It is quick and fun to make...except for weaving in all the loose ends but it's worth the extra time :)  


Sunday, April 5, 2020

Tic Toc a Crochet Clock!!

So I have had this idea for a while now to make a crochet clock but I just wasn't sure how to go about it..... I was going to just stiffen the doily and put the clock works in the center but I was worried over time the doily might sag hanging on the wall like that.  Even tho the weight of the works would be held up by the hanger on it I didn't know how that would work out.  So I got this piece of 1/8" thick Plexiglas 12" square from Meisel Hardware Specialties.  I had gotten the clock works a while back from Amazon so I already had that on hand.  I read online you had to drill and cut the plexi very slowly.  It comes with protective adhesive paper on each side so it's easy to make marks on to go by when drilling or cutting.  I started with the center hole just big enough to get the center of the clock thru.  It actually drilled very easily!!  I cut the circle out on my scroll slow again very slowly and it cut perfect!! I could even sand it smoother on my sanding disc.  So I peeled off the paper that was on both sides and started assembly.....
I wasn't sure the best way to adhere the doily to the plexi so I asked my good friends on Thread 'n Doily Facebook page for advise.  I ended up going with spray adhesive.  I took it outside and laid the doily face down on wax paper then sprayed the back of the doily really well.   Then I took the plexi and could lay it on the back side of the doily making sure the center hole lined up.  I pressed down on it to make sure it was sticking really well.  I got a little of the adhesive on the plexi but it cleaned right off with a little nail polish remover. 


After letting it sit and dry a few hours I started putting the clock works together.  I placed the hardware on just like the instructions said, making sure the center nut isn't too tight.  


On the back side, which you can't see well from here, I put a dot of hot glue on each side of the works to keep it from slipping around on the back since you don't tighten up the center nut to hold the works in place.  The hot glue works great!!


I also made a little "doily" to hang on the pendulum instead of the piece that came with the works.  I cut a little circle about 1 1/2" across from the corner of a leftover piece of plexi and stiffened the little doily and after that was dry laid it wrong side up, put hot glue on the back and stuck the plastic disc onto the back of the doily.  Then I hot glued the pendulum to the plastic disc on the back of the little doily. So after putting on the hands and hanging on the pendulum I inserted the battery and hoped for the best..... 


It worked!!!  Only thing is I didn't realize the clock came with black hands instead of shiny hands so I had some gold paint in my paint box and I painted over the black hands which is in the last picture....


They do stand out a little more but sometime I might order shiny hands to put on it instead.  


I am really happy with how it turned out!!  One more thing checked off my crochet to do list!!  

This pattern is the Springtime Doily and is a free download on Ravelry if you are interested in the pattern....

You can get it at this link:


Sunday, March 29, 2020

Springtime Doily


With everyone having to stay home and maybe looking for something to work on to brighten up your home this spring I have just released this FREE Springtime Doily pattern you can download and start working on right away at the following link:
It can be worked up in about 3 hours and the flowers are join on the go so it's all finished except for trimming loose ends when you are finished. It would be pretty in a hoop, too!! Lots of color combinations and ideas for a this pattern.
The pattern is worked in size 10 crochet thread with a size 7/1.65mm steel crochet hook. Once you make one it's hard to stop as you can see from the different ones I have made!!
I hope you will give this easy pattern a try!!


Sunday, November 17, 2019

Motif Medley Sweaters


Way back in 2016 I had put together this table runner called Motif Medley.  The pattern for it is in the April 2017 issue of Crochet World.  It is made up of 3 sizes of motifs and 3 different colors.  I liked how all the colors came together and it was very easy to adjust the size and make it larger or smaller.  


So I had all these little samples in a bag I had made while writing up the instructions for the runner and was wondering what to do with them.  Then I got to thinking why wouldn't this pattern make a neat t-shirt type sweater?  I have never had any success in the past with making clothes to fit me or anyone else!!  I just gave up trying because it's a lot of work when the end result doesn't fit!!  So the thought occurred to me what if I laid out a t-shirt that fit me and made the motifs to fit that shirt..... wouldn't that make it fit me when it was finished?  So I took the motif sections I had and added more to them laying them on  top of a t-shirt as I went for sizing


I made them to fit the front section first, then decided where the neckline would be and then went out for the sleeves.  To make the back fit the front I did the same thing but where the sides and top of sleeves were I had to remember to connect them to the front in the process so it would be joined on the go and finished when all was done.  Then I added in the little fill in motifs.  All of these motifs are the same ones in the pattern for the runner.  


I wasn't sure what to do about the open section in the underarm area so I used the same motif as before and just connected it in the joined areas of the motifs instead of into the shells.  That filled it in just right!!  


Here is a close up of how the larger motifs are joined to each other....


.....and here is how the fill in motifs are joined in. 


Around the neckline, sleeve edges and bottom edge are the same edge motifs from the runner as well.  This is a picture of it being blocked.  To block it I just hand washed it in cold water then stretched it out on a towel and pinned it out with stainless steel pins to air dry. It could be machine washed but I like to do it this way. 


And this is all the little tails I cut off after it was blocked !!  I like to wait and trim the tiny tails after blocking so the threads are  more secure before trimming. Usually I use a magnifying glass and tweezers to make sure I can find them all!!  


I just couldn't believe how easy it came together and that it actually fit me!!!  

So after that I got the idea to make one that was more of a cardigan or shrug style to wear with a black sleeveless dress I had.  

I did this the same way.  I used the same rows of motifs since the first pattern fit and just didn't join the  middle front. As  I guide for this one I used a little jacket that came with the dress I was going to make this for.
  

This one  used 3 colors as well.  I really like how they look with the black behind it.  


]
After it was all together I put it on the blocking board.  I put little pieces of wax paper behind the buttons because I was afraid they might rust laying on the wet thread while it dried.  Don't know if it would but I just wanted to be careful after all that stitching!!


This is the back side of the cardigan on the blocking board

I used these metal buttons I thought looked good with the motifs and the colors.  I just made the one chain space on the center front larger for the button to slip thru.  Really the neck opening is large enough that I don't need to open the buttons but it's an option this way.  


I love how this one turned out, too!!

So then THIS idea popped into my head to do next!!  


I wanted to try it as a tunic with long sleeves in a solid color. 


This one is Navy Blue and has a little decorative opening at the neckline with a button decoration, it doesn't function as a button...


This is the back/shoulder area....


... and this is the middle back.


On this one I wanted more of a bell sleeve so I didn't put the little fill in motifs on the ends of the sleeves this time.  

All of these were made using Aunt Lydia's size 10 crochet threads and a size 7/1.65mm steel crochet hook. They took a good amount of time to make but I had other projects to make in between so I guess it seemed to take longer than if I had started on them and not put them aside so many times.  

I am really happy with how they all turned out and with the fit as well and it was so easy by doing it in sections this way over a shirt that fit me.  Maybe this technique will work for you if you have trouble making anything to fit you well!!  

Evidently the judges liked them all too :)  


I've got another idea in mind for my next clothing project so stay tuned...... ;)