Sunday, October 27, 2019

Down on the Filet Crochet Farm....


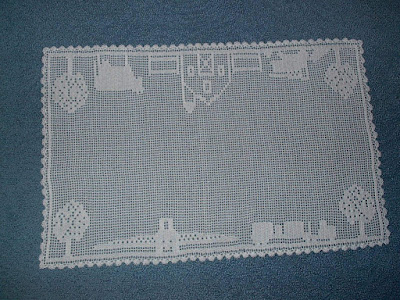
 Way back in 1992 I think it was I got into designing Filet Crochet patterns.  We were still milking cows and I couldn't find any farm theme patterns much so I thought why not make my own!! So I got out some graph paper and gave it a try.  


At the time we were into dairy farming so I went with that kind of theme.  Tractors, cows, silage wagons, combining..... we have always been into combining!!  (please excuse the poor photography on this one...)


On a whim I sent it in to Crochet World and they published it!!  It was in the August 2007 issue if you would like to look up the pattern and try it for yourself sometime.


So from that pattern I started to branch out and pull out different designs from it to do other things.  
I made this valance in two different lengths.  One for a regular window and one for a 6' wide doorway.  I am using this smaller one now over our closed up fireplace.  Kinda like it there!!


Then I made some with just one object on  each end.... a cow, a tractor, a truck, combine...Some like this, some with one item in each corner.... lots of possibilities!! (and I can't find the pictures of the others right now.....


Then I put in a few other elements as our farm life changed...


A sprayer and a spray nurse tractor trailer.


I also made some little strips of some of the items and added to the front of my toaster and tea maker machines. 


Then a few years ago a friend asked me to make her son a runner for his new house.  She liked the original one I made but I didn't think that was a good fit with the things he liked.  He had just come off a summer of working with a custom combine crew in the mid-west and also loves to hunt so I pulled up the filet crochet computer program and started playing with ideas.  Needless to say it was a big hit!!  Has been very popular on my Ravelry and Etsy pages as well!!  I made myself one to hang over the edge of a shelf on our TV.  


Then a few years ago the idea popped into my head to incorporate all these things and a few more into a large wall hanging.  It took me 3 months.... (size 60 thread and size 13 hook) counting ripping out mistakes.... to get it done!!  I'm pretty happy with the results, tho!!  I added into this one also a drill and called it Fall on the Farm.  I tried to incorporate all the things that happen in the fall of the year.  I don't have a pattern available for this particular design, it was a job enough just making it the first time!!  So if I ever do make it up for sale I'll post the info but for right now it's just mine.  

So as you can see there are many possibilities of things you can make using the filet crochet technique with a little graph paper or a nice easy computer program that actually shows you what the finished item will look like!!  Don't know what I ever did without it!!   


Sunday, October 20, 2019

Lacy Trees


Recently my Lacy Trees pattern was published in the Annie's special edition called A Very Crochet Christmas.  Below is their beautiful picture of the trees....


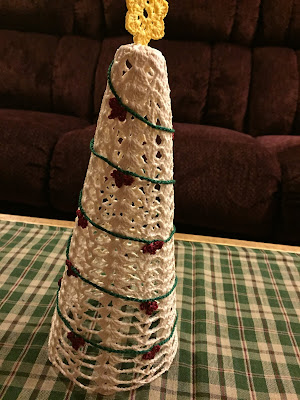
There are 3 sizes - 7 1/4", 10 1/4" and 13 1/2" from the bottoms to the tops of the stars.  The larger star has a six sided star, the other are 5 sided.

They are stiffened and stretched over 6", 9" and 12" Styrofoam cones.  


A tip for stiffening the trees..... put two or three layers of the plastic wrap over the tree it makes it much easier to pull the Styrofoam cone out when it is finished drying.  If you kinda twist the cone it will come loose easier.  


They have a crocheted garland wrapping around them but would be pretty as well with small battery lights swirled up inside of them.


Originally I had  made them in Antique white with Forest Green and Burgundy garland.  I crocheted the Forest green chain then went back and added the Burgundy berries.  The printed pattern the berries are worked in as you go. 


I also made them in Forest Green with little simple crocheted ornaments that are just 6 single crochets worked into a magic ring, join in first sc and fasten off.  


All the trims are attached to the trees with permanent fabric glue making it super simple to put together.  


They really add to a holiday grouping as well.  Winter Buddy snowman is pretty happy in the middle of the "forest" !!  


If you would like the link to make your own trees go to :


to get your copy of the magazine or your local craft store news stand and if you would like to make the Winter Buddy snowman pattern you can get the pattern at:


Saturday, October 19, 2019

Autumn Wreath

I had bought this pip berry and rusty star garland with the intention of draping it across a hutch for the summer months.  When it arrived it was shorter than I thought it would be and way darker.....more like for Halloween I thought. So I went to put it in the craft room storing it away for fall and when I laid it down it curled into this ring..... A light bulb went off and I thought hey!!!  a wreath!!  Then the ideas started coming so I went to my stash of embroidery hoops and found a 12" that fit the garland perfectly. I think the garland turned out to be 40". I painted the hoop black. Then I thought about what to put in the center of the wreath.  There are tons of beautiful fabrics out there especially for fall and I thought about stretching one of those in the center then of course crochet popped into my head.  


So I came up with simple filet pumpkin pattern.  Very simple, just drew it out on my filet computer program but you could also do it on a piece of graph paper.  The gauge for my own tension  of crocheting was  4 spaces and 4 rows - 1" The thread I used was Aunt Lydia's size 10 in Russet


I stretched it into the ring.....


Then trimmed off the back pretty close to the hoop.  I spread Elmer's glue all over the edges to keep them from fraying and let it dry overnight.  


Then I took black zip ties....


....and zipped the garland around the hoop to secure it.  


The hanger is just a piece of jute twine in the embroidery hoop top. 


I'm pretty happy with how it turned out and was able to put the garland that didn't work out to a better use!!


It's very pretty on the door this fall especially with the inside light shining thru!!

You can make your own with the fabric center, just hot glue the wreath/garland to the front of the hoop instead.  With the filet there were holes to run the zip ties thru.  

Happy Fall Y'all!!!  

Wednesday, October 16, 2019

Winter Wonderland Table Runner

So happy to have another pattern in Crochet World.  The December issue has been released and my Winter Wonderland Table Runner is in it. This is their beautiful photo of it they make all my designs look so nice!!


The finished size of the runner is 18" x 40" and it is worked in size 10 crochet thread with a size 7/1.65mm steel crochet hook


If you didn't want a whole runner, you could just work one end of it to make a place mat or a doily...


Another pattern that is very versatile!!  

You can get Crochet World at your local craft store or news stand or at the following link...

https://thefarmerswifecrochet.blogspot.com/

or check out more details at:

This would be a great runner to display all winter long!!


Sunday, October 13, 2019

Lacy Scallops Scarf


I'm very happy to have my scarf included in the Winter 2019 issue of Crochet! Magazine!!  I had originally made it in this Lion Brand Heartland #180 Kings Canyon yarn I came across at Joann and couldn't pass up with some buttons I thought were very pretty with the yarn colors.  


This scarf is 5" wide by 87" long and is joined with this little crochet button clasp so it can be work with it buttoned as a long scarf, cowl or any way you wish!!  


It is very easy to make and is worked from 1 skein and all done as you go so only two ends to work in when you are finished!!  The only challenging part is working on both side of the long starting chain but after that it's a piece of cake!!  


So when the editor contacted me about choosing the pattern she suggested Caron Simply Soft Chartreuse color yarn and these 20 hole buttons!!  I'd never heard of them before and she had them sent to me to play with and add to the project.  What fun they are!!  There are endless possibilities to the edgings that can be added to these buttons.  I decided to pull the yarn plies apart and using a small hook, crochet the edging chain into the holes.  I thought keeping the stitches inside the button edges would make them stand out better.  They are available at Katrinkles.com and there are so many neat things on their website, you'll have to check it out and see what neat things you can make with their products!!  


I really like how it looks in the Chartreuse  as well.  Some of my pictures the color doesn't show up so well but you can see in their professional photograph how pretty it is.  


I like the buttons both ways, really but the 20 hole ones do make it more interesting!!  

Here is the professional picture from Crochet! Magazine.  They always do such a great job of showcasing the designs!!


I hope you will give this pattern a try!!

You can get your copy of the latest issue on news stands or at :


or more info on:


Sunday, October 6, 2019

Middletown Community Show

 This past weekend was the Middletown Community Show.  It was fun to help out and see all the behind the scenes action!!  I also entered a few items as well....


Bunny & Egg Wreath


Doily


Pillow


Ornnament


Snow Globe


Jewelry


Table Cloth


 Tunic


Pumpkin Wreath

What a great show and fair season it has been!!  Now to get going on next year :)